Thursday, January 31, 2013

Hello, Washi

Hello, today I have a clean and simple card using homemade washi tape. Claire at Waltzingmouse Stamp has a great tutorial on her Monday morning Make post here. Be sure to check out Claire's clear instructions, great samples, and  all the entries. On to my card and my  process.
I have some Scotch Brand double sided removable tape that I found was great to work with since I could move it easily to different surfaces. I moved it from the cutting mat, to the craft mat, even to black cardstock for ease of stamping, and back to the craft mat until I was ready to place it my card. I started with the tape on my cutting mat where I applied white tissue paper and cut with a straight edge and cutting knife. Then I  moved on to stamping. While it would certainly be easy to color with Copics, I wanted a white background for my stamped designs.  I used border stamps from  Waltzingmouse Stamps Victorian Frippery, French Country, and Heirloom Patterns and stamped in Evening Dusk, Rosebud, and Tangelo Memento inks. The sentiment and frame are from Fancy Phrases. I added couple of black gems for a little bling and added a three score lines along the edge.

My thanks to Claire for this technique which I will use again.

Monday, January 28, 2013

Be Very Good

It's finally time for me to jump on the chalkboard bandwagon. After a false start a few weeks ago when I discovered my white ink cube was bone dry, I now have a new ink pad and Claire at Waltzingmouse Stamps encouraging me with this challenge     
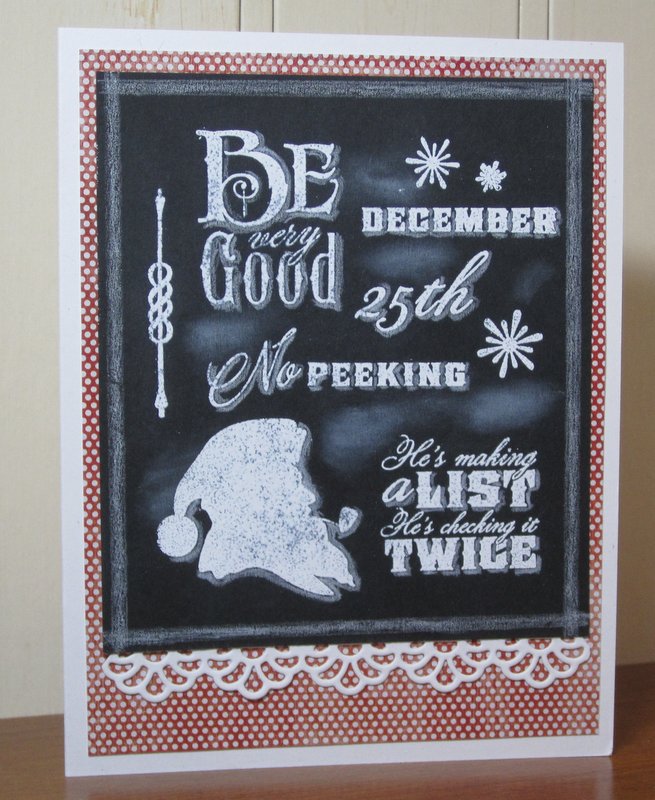
With much of the emphasis of chalkboard art on varied fonts, I chose to work with stamps from  WM Stamps Santa's Coming to Town which has such wonderful fonts as do so many of Waltzingmouse Samps.. A few additional stamps from Very Vintage Labels #4 and Compliments of the Season finish my initial attempt at this technique. I followed Kelly Schirmer's advice of using a white pencil for shading rather than offset stamping.
I used a heat gun by Paper Studio and would love to know if you think another brand of heat gun would produce better results. I'd like to think the less than satisfactory embossing is the result of the tool; however, in all probability, it's the tool's operator;so I'd appreciate any tips for embossing.
Despite the faults I find with the finished product, I did enjoy this technique and will be using it again.

But this Monday morning, after a student holiday and two snow days, I have a morning of tutoring.
Have a good week,


Supplies:
Stamps: Santa's Coming to Town, Very Vintage Labels #4, Compliments of the Season(Waltzingmouse Stamps)
Ink: Fresh Snow Pigment Ink (PTI), Versamark Ink
Paper: Rustic White, True Black (PTI); Glitz Designs Noel digital paper
Other: Filigree Fine Detail white embossing powder, Filigree Border die (PTI), white Prismacolor pencil

Sunday, January 27, 2013

FTTC #204

Cindy Haffner, hostess of Flourishes TimelessTuesday Challenge  #204, challenges us to use a fishtail, circle, and pearls.  I was longing for some bright colors and summer bouquets after Friday's ice storm, so I picked Flourishes Garden Picks for my floral bouquet. I used the cut file, stamped, colored, and placed the bouquet on the circle of the die cut doily,  A fish tail tag with a sentiment from Botanical Bookplate Vol. 1 and few pearls completed the challenge, and I have a bit of summer on a frigid winter day.

Thanks for stopping by,


Supplies:
Stamps: Garden Picks,Botanical Bookplates Vol. 1
Ink: Memento Expresso Truffle and Black Tuxedo
Paper: Hibiscus Burst, Stamper's Select White (PTI); Pretty Party 6x6 pad (Crate Paper); Blending X-Press It
Other:  Garden Picks cut file (Flourishes); Shapeabilities Lacy Pennants (Spellbinders); Parisian Doily die, Hibiscus Burst twill ribbon(PTI); butterfly punch (Fiskars); pearls; Copics

Friday, January 25, 2013

Papertrey January Blog Hop Challenge


This month's  Papertrey Blog Hop challenge is to use a black background. I thought about how the LBD-little black dress ( for me, this equates more specifically to the little black sheath) is such an elegant classic and so fun to accessorize; so I decided to create the LBPB-- little black pillow box and accessorize with subtle embossing and a dash of color.

Using my Silhouette Cameo and a file from Lori Whitlock, I cut the pillow box out True Black cardstock. I stamped and embossed the oval frame from PTI's  Pretty Peonies Stamp set. . Then I stamped a peony from the same  set with Memento Black Tuxedo ink onto Blending Card by X-Press It, fussy cut, and then colored with Copics. The end result is an elegant little box, perfect for a special gift.

Thanks for stopping by and enjoy the hop,

Saturday, January 19, 2013

Poppy-Flourishes Timeless Tuesday Challenge #203

It's been some time since I played along with Flourishes Timeless Tuesday Challenge; however, the current  challenge with hostess Broni Holcombe is a great color challenge to get back into the swing of things. Broni's challenge is to use at least one color from each of these Flourishes Color Made Easy paper combos.

I used patterned paper from Lily Bee Design Memorandum 6x6 pad and stamps from Flourishes Poppy Patch set which I stamped with Memento Rich Cocoa ink on  Express it Blending Paper dies, cut with Flourishes cut files and my Cameo.  I love that Flourishes is providing these cut files; I look forward to more files--hint, hint--Sweet Violets, Strawberries, Hearts and Flowers--please. :)
I mounted the colored images on a tag (Memory Box Distressed Tag stamp) and added the sentiment on kraft cs to tie in the card base. I added a little more brown by inking the edge of the sentiment tag, adding Dark Chocolate pinked edging, and twine.
The twine in a pack of several colors by American Crafts was a surprise find at TJ Maxx this week. Hubby and I needed to kill a little time before having lunch on Wednesday.  The silly man asked if there was anywhere near the restaurant I would like to go before lunch. Hello!  TJ Maxx, Joanne's, Michaels.  I visited two of the three but limited myself to only one purchase. That could be because I'd made two on-line stamp purchases this week. :)
Meanwhile, after five days of rain which caused flooding in some nearby areas, the rain turned to snow Thursday afternoon, so these are some of the views we had Friday morning. We don't have much snow anymore here in Knoxville, so it's always a little exciting. And with icy roads, no school so no tutoring Friday morning.  I'm a little ashamed to admit that I was a tad bit happy about this.


Thanks for stopping by,

Thursday, January 17, 2013

Be Mine-- Waltzingmouse Blog Party


What fun--the first Waltzingmouse Stamps Blog party of 2013! Using this month's party theme of LOVE.,Waltzingmouse Stamps Nordic Spring stamp set, and a crisp red and white pallette, I created this card.

I was inspired by red and white Scandinavian fabrics and designs.

Party on!


Supplies:
Stamps: Nordic Spring (Waltzingmouse Stamps), Heart Prints (PTI)
Ink: Pure Poppy (PTI)
Paper: Stamper's Select White,Pure Poppy (PTI)
Other:  Classic Heart, Scalloped Heart dies (Spellbinders); Pinking Shears Border die, Double Ended Banner die, Bloom Builders 3 die,  Vintage Cream felt,Vintage Pure Poppy button (PTI); Fleur Tile embossing folder (Sizzix); Red Baker's Twine (Divine Twine); red embroidery floss

Monday, January 14, 2013

Magical Monday

 Monday-- the beginning of pleasant possibilities

I'm happy to be playing with CAS(E) this Sketch! this week, using this sketch

After stamping the image and sentiment from Pixie Dust (Crafty Secrets), I colored the image with Prismacolor pencils.


And inside the caterpillar, perhaps with the aid of a little pixie dust, turns into a butterfly.


Thanks for stopping by. I hope your Monday turns into a beautiful week.

Sunday, January 13, 2013

A Crafty Resolution

 One of my resolutions for this year is not to wait until the last minute to make cards and projects for birthdays and holidays,  so this month's  Crafty Secrets Linky Party is the perfect opportunity to get started on Valentine's Day projects.   I used sweet images from Crafty Secrets digital Valentine  kit from last year. I layered these on a red lacy edged heart die cut along with some Spellbinder heart die cuts stamped with PTI's  Bitty Background Blocks.  The stamped birds are from Crafty Secrets Birds of Happiness.


For this second Valentine I also used Crafty Secrets Calendar stamp set and PTI's Wonderfully Whimsical stamp set.

While these are wonderful to give as they are, they would also be great embellishing a painted peat pot, or a tin pail, or a small paint can, even a paper beverage cup---all filled with chocolate, of course; I mean we are talking Valentine's Day. Stop by again to see where these hearts land.


Supplies:
Stamps: Calendar, Birds of Happiness (Crafty Secrets); Wonderfully Whimsical, Bitty Background Blocks(PTI)
Ink: Memento Black Tuxedo, Memento Summer Sky
Paper: Pure Poppy, Spring Rain (PTI); white (Georgia Pacific)
Other: Valentine Digital kit (Crafty Secrets), Classic Heart and Classic Heart Scalloped dies (Spellbinders), Nesting Doily Hearts (Lifestyle Crafts), heart buttons (Hobby Lobby)

Monday, January 7, 2013

"The forward violet..."


                                       "The forward violet thus I did chide-
                                     Sweet thief, whence didst thou steal thy sweet that smells
                                       If not from my love's breath?" 
                                                                                  William Shakespeare, Sonnet 99   


With Flourishes' January release this week, they are sponsoring a  challenge to create a card focusing on love and /or letters. Violets symbolize faithfulness and were often given as tokens of love, so I chose  the violets from Flourishes Botanical Bookplates Vol.1 for the focal point of a Valentine's Day card.

Seriously, you know me; I jump at any chance to use my violet stamps. :)

Wishing you a week filled with promise as violets in January,

Supplies:
Stamps:Botanical Bookplates Vol 1 (Flourishes), Winter Words (Just Rite Stamps)
Ink: Memento London Fog, Sweet Plum 
Paper:  Stamper's Select White (PTI)
Other: Prismacolor pencils, Thank You Set #5 embossing folder (Sizzix), ribbon (Offray)


Tuesday, January 1, 2013

Happy New Year

I love the days between Christmas and New Year'sDay---the slower pace after busily preparing for Christmas and the thoughts of possibilities for change a new year brings.  I hope the joy of creating doesn't falter this year and here on the old blog- o, I hope the change is for more regular posts and visits with old and new friends.
Let's start the year with some cards to celebrate the beginning of 2013!  These are headed out to some special people.


Simply stated -----