Friday, December 6, 2013

Making a List and Checking It Twice


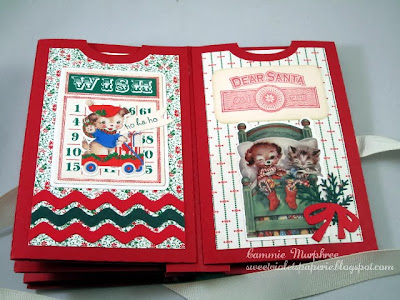
Does this time of year lead you to making many lists? Gifts to purchase, groceries to buy, goodies to bake, projects around the house to complete, cards to mail---the lists often seem endless. Make and keep up with those lists with something festive like  this organizer; there are eight pockets, and each pocket has a printed card for making and checking the list.


The papers, bingo cards, and all but two of the other images are from Crafty Secrets Creating with Retro Christmas Digital Kit. I used the 3d Christmas list organizer file by Jamie Capps that can be found in the Silhouette store. It easy to import patterns and png files with the Cameo, and using the trace, offset, and print and cut features makes cutting the png files a snap. I digitally layered the images on the front so it would be flat--no bits and bobs to catch on anything when I toss the organizer in my purse. But inside everything is cut and layered by and hand and glue for more dimension.

I'm linking this to Crafty Secrets Linky Party here, and then I'm off to tackle those holiday lists.


Supplies:
Paper: Creating with Retro Christmas Digital kit (Crafty Secrets),  Epson Premium Presentation paper,cardstock (Paper Studio and PTI)
Dies: Heart Border, Super Stars Border, Loop de Loop Border,Circle Border, Rick Rack Border, Button Up #2, Seeing Stars,Fillable Frames #7,Holly Jolly (PTI); Under the Mistletoe (WPlus9)
Stamps: Dear Santa (WPlus9); Bitty Background Blocks, Tiny Treats:Christmas (PTI)


Monday, November 11, 2013

Christmas Tags


Today I'm sharing a few Christmas tags. I used Crafty Secrets Creating with Vintage Christmas Digital Kit for the images and patterned paper backgrounds.  


These images with the red and green borders are in JPEG form on one sheet but it is easy to separate the images and use them individually.
  

For each of these tags, I used a tag in the kit for a mask and then layered the papers and images, adding drop shadows to the images. Then it was on to printing and fussy cutting the tags. I used the Silhouette Cameo to create a layering mat cut with solid cardstock.  Then it was time to pull out the bits and bobs and embellish!

I'm linking this to the Crafty Secrets November Linky Party.

Thanks for stopping by,

Monday, October 14, 2013

Let the Treats Begin


Since Ms. Kitty Teapot has donned her witch's hat, it must be time to scare up some Halloween treats and of course, something special to hold those treats. I started with some peat pots that have been in my stash for awhile and painted them with Folk Art Metallic Sequin Black acrylic paint. Although not obvious in these photos, in real life, these tiny pots do have a subtle shimmer. I stamped two labels from Crafty Secrets Halloween Labels and colored with pencils, using a colorless blender pen to blend the colors.  While I used the original acrylic stamps, these stamps are now in digital form, so you can easily adjust the size of the labels.
See the little black cat button above. I used the border stamp from Crafty Secrets Jolly Halloween and masked everything but the cat. I covered the stamped circle with an epoxy circle and attached to a glittered scalloped die cut. Remember to look at your stamps as parts. It's easy to mask with acrylic stamps, and if you use Photoshop Elements with your digital stamps, use the eraser tool to get just the image you need.                                  

I couldn't pass up this crazy variegated yarn on clearance! With green, orange, purple, and blue, it's perfect to use on Halloween projects. One skein should last a long time unless I actually use it for knitting :)

I'm linking this to Crafty Secrets October Linky Party here. Be sure to check out the great projects and tutorials by the design team.

Thanks for stopping by and check back later for more Halloween projects.

Thursday, October 10, 2013

Flourishes October Release Challenge


Flourishes October release is underway, and with that release they are sponsoring a challenge called Christmas with a Twist. The twist is to create a Christmas card or project without using red or green.
I went with a soft color scheme of aqua and cream.


Meet Me Under the Mistletoe stamp set provides the focal point. Using Flourishes cut files, I cut the shape with the Silhouette and then stamped in Toffee Crunch Memento ink. I know I say this every time I use these cut files, but I really do LOVE them! I do hope they will provide more cut files for some of the older sets.  After coloring the ribbon with Copics and adding some pearls for the berries, I inked the edges with Antique Linen Distress Ink. I added it to the card front (a Silhouette cut file) with dimensional tape. The sentiment is from Flourishes Sleigh Ride.Last, I repeated the roundness of the kissing ball and the bottom edge of  the front and added a little more texture with a circle border cut from aqua felt.

Be sure to check out the release at Flourishes and all the gorgeous and inspiring cards from the design team.

Thanks for stopping by,

Monday, October 7, 2013

My Corner of the World--Flourishes World Card Making Day Challenge


In honor of World Card Making Day, October 4, 2013, Flourishes is sponsoring a challenge to create something that represents or is inspired by your state or province.
The iris is the state cultivated flower for Tennessee, so I chose this iris stamp from Flourishes Year of Flowers Set 2 and colored it with Copics. The background stamp is from Basic Gray and the flourish die cuts are from My Favorite Things.


Have a great day and remember you have until Friday to submit your card to the challenge here.

Friday, September 13, 2013

Autumn Thanks

Flourishes September Release is underway, and they are hosting a Get in Shape release challenge. You can read about the challenge here. I made a bottle tag with a small pocket for an additional little treat--maybe some gourmet chocolates :)


I used Flourishes Seasonal Wreaths stamp set and cut file.

Be sure to check out Flourishes beautiful new Christmas stamps,

Supplies:
Stamps:Seasonal Wreaths (Flourishes), Turning a New Leaf (PTI),Cover-a-Card Newsprint (Impression Obsession)
Ink: Memento Rich Cocoa (Tsukineko), Ripe Avocado (PTI)
Paper: Vintage Cream, Canyon Clay,Ripe Avocado (PTI); Blending Card X Press It (Copic)
Other: Cut file for Seasonal Wreaths (Flourishes); Silhouette file #22517; Turning a New Leaf die, Tiny Tags die, Linen Impression plate,rustic twine (PTI); Copics

Thursday, September 12, 2013

Flourishes Timeless Tuesday Challenge #237

This week's Flourishes Timeless Tuesday Challenge hostess Katie Sims challenges us to use dry embossing.

I made this acorn shaped card using a Silhouette file  #33026; after duplicating the shape and flipping one,I welded the two pieces to form the card base. I cut a third bottom piece which I embossed and inked with Wild Honey Distress ink. The cap's edges were also brushed with brown ink. A few leaves from Flourishes Falling Leaves, fussy cut and colored with Prismacolor pencils, and some twine finish this fall card.

Be sure to check out Flourishes September release--gorgeous Christmas stamps!
Thanks for stopping by,

Supplies:
Stamps: Falling Leaves (Flourishes)
Paper: Stamper's Select White, kraft (PTI), brown (Paper Studio)
Ink: Memento Rich Cocoa, Wild Honey Distress Ink
Other: Silhouette file #33026, Prismacolor pencils, Victoria embossing folder (Cuttlebug)

Wednesday, September 4, 2013

Tiny Treasure

It's time again for Crafty Secrets Linky Party. This month I created a  tiny bird house guarded by a fairy, perfect for a tiny treasure such as a love note, a tooth for the tooth fairy, a jewel, or chocolate
nestled inside.


This small favor box, approximately two inches, was cut with Lori Whitlock Silhouette file #38481.

The Crafty Secrets digital garden fairy was printed and cut using the Silhouette. With the Designer Edition of Silhouette it is easy to import digital stamps. Opening the stamp file with the bird house file made it very easy to adjust the size of the fairy stamp. Since the stamp is fairly small, I wasn't certain how well the print and cut feature would work, but I was impressed with how well the Silhouette cut this small image.  I colored the fairy with Copics and added some sparkle to the fairy's wings with a glitter pen.

A tiny banner, flowers, butterfly, and bumblebee decorate the sides while some pretty digital paper covers the roof.

What tiny treasure would like to find inside?


Supplies:
Stamps:Fairy Wishes Digital Stamps, Queen Bee,Sweet Kids,Born to Fly Clear Art Stamps (Crafty Secrets); Mini Banner Greetings (Pink Persimmon)
Ink: Memento Black Tuxedo (Tsukineko)
Paper: Rustic Cream (PTI), patterned digital paper (iralamijashop),Blending Card by X Press It (Copics)

Wednesday, August 14, 2013

Celebrate! Flourishes August Release Challenge

Flourishes August Release Challenge is all about color with the rules to use teal, rust,and gray.

Let's start from the bottom layer and work up to those gerber daisies.  A muted teal is the base for this card. A plaid paper of teal, gray, and cream and a gray text patterned paper are matted on rust cs with rust pinking between the two patterns.  I stamped the gerber daisies and butterfly after cutting the shapes with the Silhouette files sold by Flourishes---love the files for Flourishes stamps!  Then I colored with Prismacolor pencils and mounted with dimensional tape.  A little twine and a sentiment from Seasonal Wreaths stamped on a die-cut flag finish the card.

Thanks for stopping by and have a great day,


Supplies:
Stamps: Gerber Daisies, Seasonal Wreaths (Flourishes)
Ink: Rich Cocoa, Expresso Truffle (Memento by Tsukineko)
Paper: Vintage Cream, Canyon Clay, Ocean Tides (PTI); Lost and Found:Portobello Road (My Mind's Eye)
Other: Prismacolor pencils; Mini Wavy Pennants die (MFT); Silhouette Cameo; Pinking shears die, rustic twine(PTI)

Thursday, August 8, 2013

Sweeten the Day

Sugar cookies are a sure way to sweeten some one's day. And a cute cookie box and card make the presentation even sweeter.

The cookie box was made with Silhouette file #44621. The polka dot paper was printed from Crafty Secrets Vintage Patterns CD.

I used PTI's Everyday Treats and Crafty Secrets Birds of Happiness for the tag tied with baker's twine,naturally; the box is filled with cookies.


I love these adorable little feathered bakers from Crafty Secrets digital stamp set Sweet Stuff. I enlarged the image, printed it on Blending Card by X Press It, and colored it with Copics. Then I used Distress Inks to age the edges.The patterned paper is the same used on the cookie box; however, on a smaller scale with a border of cookie cutters also from Sweet Stuff. Next, a small recipe card, printed with more scaled-down digital papers and a sentiment and image from Sweet Stuff was added with dimensional tape.(The ability to adjust the scale and size is a great advantage of digital paper and stamps.)  Finally, more baker's twine ties it all together.


I am linking this to Crafty Secrets August Linky Party here.

Ok, now for something a little crazy that I did with digital stamps. Here's the background, Ed and I recently spent a wonderful evening at an outdoor concert with Heart at Biltmore in Asheville, NC.  Since the concert starred Nancy and Ann Wilson, I wore my "rocker" top. Ed commented that I needed a nice tat since the sleeves had openings to showcase the tat.  Well, no real tat, but I did add one to the photo(bottom right corner) in that week's Project Life page.
 I don't think needle and ink will ever hit my skin, but a girl can dream and photoshop one fantastic tat.
Before I go I must confess  I will have to find more cookies to put in the cookie box because some of these sugar cookies are going to sweeten my day.

Wishing you a sweet day with or without the cookies,

Thursday, July 4, 2013

Happy Independence Day!

How about some patriotic party elements to celebrate? ---and link to Crafty Secrets July Linky Party, since Crafty Secrets American Beauty stamp set is full of fabulous and fun patriotic images.
 This little container is a cute way to serve some snacks to guests, especially when paired with a cool drink served in blue mason jar with decorated paper straw. The snack container was made with a Silhouette cut file. The 4th of July and stars from  American Beauty were stamped, fussy cut, and attached to die cuts from PTI.


The USA stamp, also from American Beauty, is a another neat little element to add to this drinking straw.

I'm hoping the sun will break through  by this afternoon so we can fill these and head outdoors.

Happy Birthday, USA!


Supplies:
Stamps: American Beauty (Crafty Secrets), Gingham (CHF)
Ink: Pure Poppy (PTI), Memento Paris Dusk (Tsukineko)
Paper: Enchanted Evening, Pure Poppy, Stamper's Select White(PTI)
Other: Seeing Stars dies, Limitless Layers 1 3/4 circles (PTI); Silhouette file #28397

Saturday, June 8, 2013

Check It Out

Gingham and flowers pair perfectly for summer!

So I had to use this combination to make more little bags.Following the steps I explained in this post, I again used Crafty Secrets Creating with Vintage Patterns CD and Lori Whitlocks's bag Silhouette Studio file.

These are perfect for tucking in a note, gift card, or favor. Plus with the Silhouette you can adjust size.


I'm linking this to Crafty Secrets June Linky Party here.

What colors or patterns say "summer" to you?