Thursday, September 12, 2013

Flourishes Timeless Tuesday Challenge #237

This week's Flourishes Timeless Tuesday Challenge hostess Katie Sims challenges us to use dry embossing.

I made this acorn shaped card using a Silhouette file  #33026; after duplicating the shape and flipping one,I welded the two pieces to form the card base. I cut a third bottom piece which I embossed and inked with Wild Honey Distress ink. The cap's edges were also brushed with brown ink. A few leaves from Flourishes Falling Leaves, fussy cut and colored with Prismacolor pencils, and some twine finish this fall card.

Be sure to check out Flourishes September release--gorgeous Christmas stamps!
Thanks for stopping by,

Supplies:
Stamps: Falling Leaves (Flourishes)
Paper: Stamper's Select White, kraft (PTI), brown (Paper Studio)
Ink: Memento Rich Cocoa, Wild Honey Distress Ink
Other: Silhouette file #33026, Prismacolor pencils, Victoria embossing folder (Cuttlebug)

Wednesday, September 4, 2013

Tiny Treasure

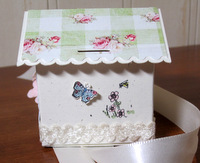
It's time again for Crafty Secrets Linky Party. This month I created a  tiny bird house guarded by a fairy, perfect for a tiny treasure such as a love note, a tooth for the tooth fairy, a jewel, or chocolate
nestled inside.


This small favor box, approximately two inches, was cut with Lori Whitlock Silhouette file #38481.

The Crafty Secrets digital garden fairy was printed and cut using the Silhouette. With the Designer Edition of Silhouette it is easy to import digital stamps. Opening the stamp file with the bird house file made it very easy to adjust the size of the fairy stamp. Since the stamp is fairly small, I wasn't certain how well the print and cut feature would work, but I was impressed with how well the Silhouette cut this small image.  I colored the fairy with Copics and added some sparkle to the fairy's wings with a glitter pen.

A tiny banner, flowers, butterfly, and bumblebee decorate the sides while some pretty digital paper covers the roof.

What tiny treasure would like to find inside?


Supplies:
Stamps:Fairy Wishes Digital Stamps, Queen Bee,Sweet Kids,Born to Fly Clear Art Stamps (Crafty Secrets); Mini Banner Greetings (Pink Persimmon)
Ink: Memento Black Tuxedo (Tsukineko)
Paper: Rustic Cream (PTI), patterned digital paper (iralamijashop),Blending Card by X Press It (Copics)

Wednesday, August 14, 2013

Celebrate! Flourishes August Release Challenge

Flourishes August Release Challenge is all about color with the rules to use teal, rust,and gray.

Let's start from the bottom layer and work up to those gerber daisies.  A muted teal is the base for this card. A plaid paper of teal, gray, and cream and a gray text patterned paper are matted on rust cs with rust pinking between the two patterns.  I stamped the gerber daisies and butterfly after cutting the shapes with the Silhouette files sold by Flourishes---love the files for Flourishes stamps!  Then I colored with Prismacolor pencils and mounted with dimensional tape.  A little twine and a sentiment from Seasonal Wreaths stamped on a die-cut flag finish the card.

Thanks for stopping by and have a great day,


Supplies:
Stamps: Gerber Daisies, Seasonal Wreaths (Flourishes)
Ink: Rich Cocoa, Expresso Truffle (Memento by Tsukineko)
Paper: Vintage Cream, Canyon Clay, Ocean Tides (PTI); Lost and Found:Portobello Road (My Mind's Eye)
Other: Prismacolor pencils; Mini Wavy Pennants die (MFT); Silhouette Cameo; Pinking shears die, rustic twine(PTI)

Thursday, August 8, 2013

Sweeten the Day

Sugar cookies are a sure way to sweeten some one's day. And a cute cookie box and card make the presentation even sweeter.

The cookie box was made with Silhouette file #44621. The polka dot paper was printed from Crafty Secrets Vintage Patterns CD.

I used PTI's Everyday Treats and Crafty Secrets Birds of Happiness for the tag tied with baker's twine,naturally; the box is filled with cookies.


I love these adorable little feathered bakers from Crafty Secrets digital stamp set Sweet Stuff. I enlarged the image, printed it on Blending Card by X Press It, and colored it with Copics. Then I used Distress Inks to age the edges.The patterned paper is the same used on the cookie box; however, on a smaller scale with a border of cookie cutters also from Sweet Stuff. Next, a small recipe card, printed with more scaled-down digital papers and a sentiment and image from Sweet Stuff was added with dimensional tape.(The ability to adjust the scale and size is a great advantage of digital paper and stamps.)  Finally, more baker's twine ties it all together.


I am linking this to Crafty Secrets August Linky Party here.

Ok, now for something a little crazy that I did with digital stamps. Here's the background, Ed and I recently spent a wonderful evening at an outdoor concert with Heart at Biltmore in Asheville, NC.  Since the concert starred Nancy and Ann Wilson, I wore my "rocker" top. Ed commented that I needed a nice tat since the sleeves had openings to showcase the tat.  Well, no real tat, but I did add one to the photo(bottom right corner) in that week's Project Life page.
 I don't think needle and ink will ever hit my skin, but a girl can dream and photoshop one fantastic tat.
Before I go I must confess  I will have to find more cookies to put in the cookie box because some of these sugar cookies are going to sweeten my day.

Wishing you a sweet day with or without the cookies,

Thursday, July 4, 2013

Happy Independence Day!

How about some patriotic party elements to celebrate? ---and link to Crafty Secrets July Linky Party, since Crafty Secrets American Beauty stamp set is full of fabulous and fun patriotic images.
 This little container is a cute way to serve some snacks to guests, especially when paired with a cool drink served in blue mason jar with decorated paper straw. The snack container was made with a Silhouette cut file. The 4th of July and stars from  American Beauty were stamped, fussy cut, and attached to die cuts from PTI.


The USA stamp, also from American Beauty, is a another neat little element to add to this drinking straw.

I'm hoping the sun will break through  by this afternoon so we can fill these and head outdoors.

Happy Birthday, USA!


Supplies:
Stamps: American Beauty (Crafty Secrets), Gingham (CHF)
Ink: Pure Poppy (PTI), Memento Paris Dusk (Tsukineko)
Paper: Enchanted Evening, Pure Poppy, Stamper's Select White(PTI)
Other: Seeing Stars dies, Limitless Layers 1 3/4 circles (PTI); Silhouette file #28397

Saturday, June 8, 2013

Check It Out

Gingham and flowers pair perfectly for summer!

So I had to use this combination to make more little bags.Following the steps I explained in this post, I again used Crafty Secrets Creating with Vintage Patterns CD and Lori Whitlocks's bag Silhouette Studio file.

These are perfect for tucking in a note, gift card, or favor. Plus with the Silhouette you can adjust size.


I'm linking this to Crafty Secrets June Linky Party here.

What colors or patterns say "summer" to you?

Friday, June 7, 2013

Hi Ho Silver!

Yikes! It's been a month since my last post. May was a busy month with the following activities among others: finished tutoring for the year and was so pleased to see my students graduate, spent a few fabulous days at the beach, planted flowers,  worked on Project Life pages, made some bracelets for my sister, and celebrated my birthday.

 We've also enjoyed more dining on the screened porch and outside which leads to this crafty project.
 These little bags are great for favors or corralling silverware for picnics and summer outdoor dinners.

Here's a brief summary of the steps, using Silhouette Designer Edition, Silhouette Cameo, Crafty Secrets digital paper and stamp, and Silhouette Studio files.
1. Add digital paper selection from Crafty Secrets Vintage Patterns to patterns file in the library. (Being able to add digital paper from other files  is definitely a wonderful advantage of the Designer Edition.)
2. Open Lori Whitlock Studio file #40187 for the bag with rounded top.
3. Fill bag with pattern.
4. Open Lori Whitlock Studio file #31874. Choose tag, remove hole, and fill with color.
5. Remove cut line of tag.
6. Open silverware image from Crafty Secrets Digital Art Stamps: Kitchen Classics. Layer on tag and adjust size.
7. Group image and tag. Layer on bag. Adjust size.
8. Remove perforated lines for scoring. (I do this simply because I prefer to score with a score board and bone folder.
9. Duplicate bag. You can cut two bags from an an 81/2 x 11 piece of paper. I use matte photo paper.
10. Follow steps for the print and cut feature of the Silhouette.
11. Carefully remove bags from cutting mat. Score, fold, and glue.

I chose the red checked pattern to coordinate with these acrylic dishes.


Of course,Lucy wandered by to see what was happening."What! No grilled chicken on those plates!"

 I am linking this to Crafty Secrets June Linky Party. Be sure to check out the fabulous projects by the designers and other entrants. The party ends Sunday, so you still have time add your project.

I'll be back tomorrow with some sweet little floral and checked bags.